Sunday 24 April 2016

Game 42 : Sands of Sudan : Relief of Jandu

This is a first for the Situation room. A battle in 28mm!!! This is the Relief of Jandu, organised by Dave Docherty who has his blog "One Man and his Brushes". The rules are the "Sands of Sudan" by Carlo Pagano. Carlo has his own blog called "With Pyjamas through the Desert". We also had Stephen Scott in our ranks who is a long wargaming friend of Dave's going back many many, many years. I met both guys at the "Wargames Holiday Centre" in about 1988.
Dave had organised a game where an Egyptian forces has to be rescued form the dastardly bad guys. Steve commanded the garrison, I commanded the relief force and Dave controlled the nasty pasties. Like any set of rules, this was the first foray and we got some things correct, some things wrong, learnt a lot and still came up with ideas for mods/tweaks we would like to try.
 

Dave pondering the rules. This is my relief column. Guns in the centre, flanked by 2 btns infantry and then in turn flanked by 4 squadrons of cavalry. The camel corps are in front and would soon dismount to act as the initial skirmish screen.


The Egyptian garrison of Junda. They were facing all four sides as an attack could appear from anywhere.


The Egyptians had a single artillery piece. The relief column had 1 machine gun and 3 screw guns.


Steve is surveying my wonderful relief column and the poise with which it advances!


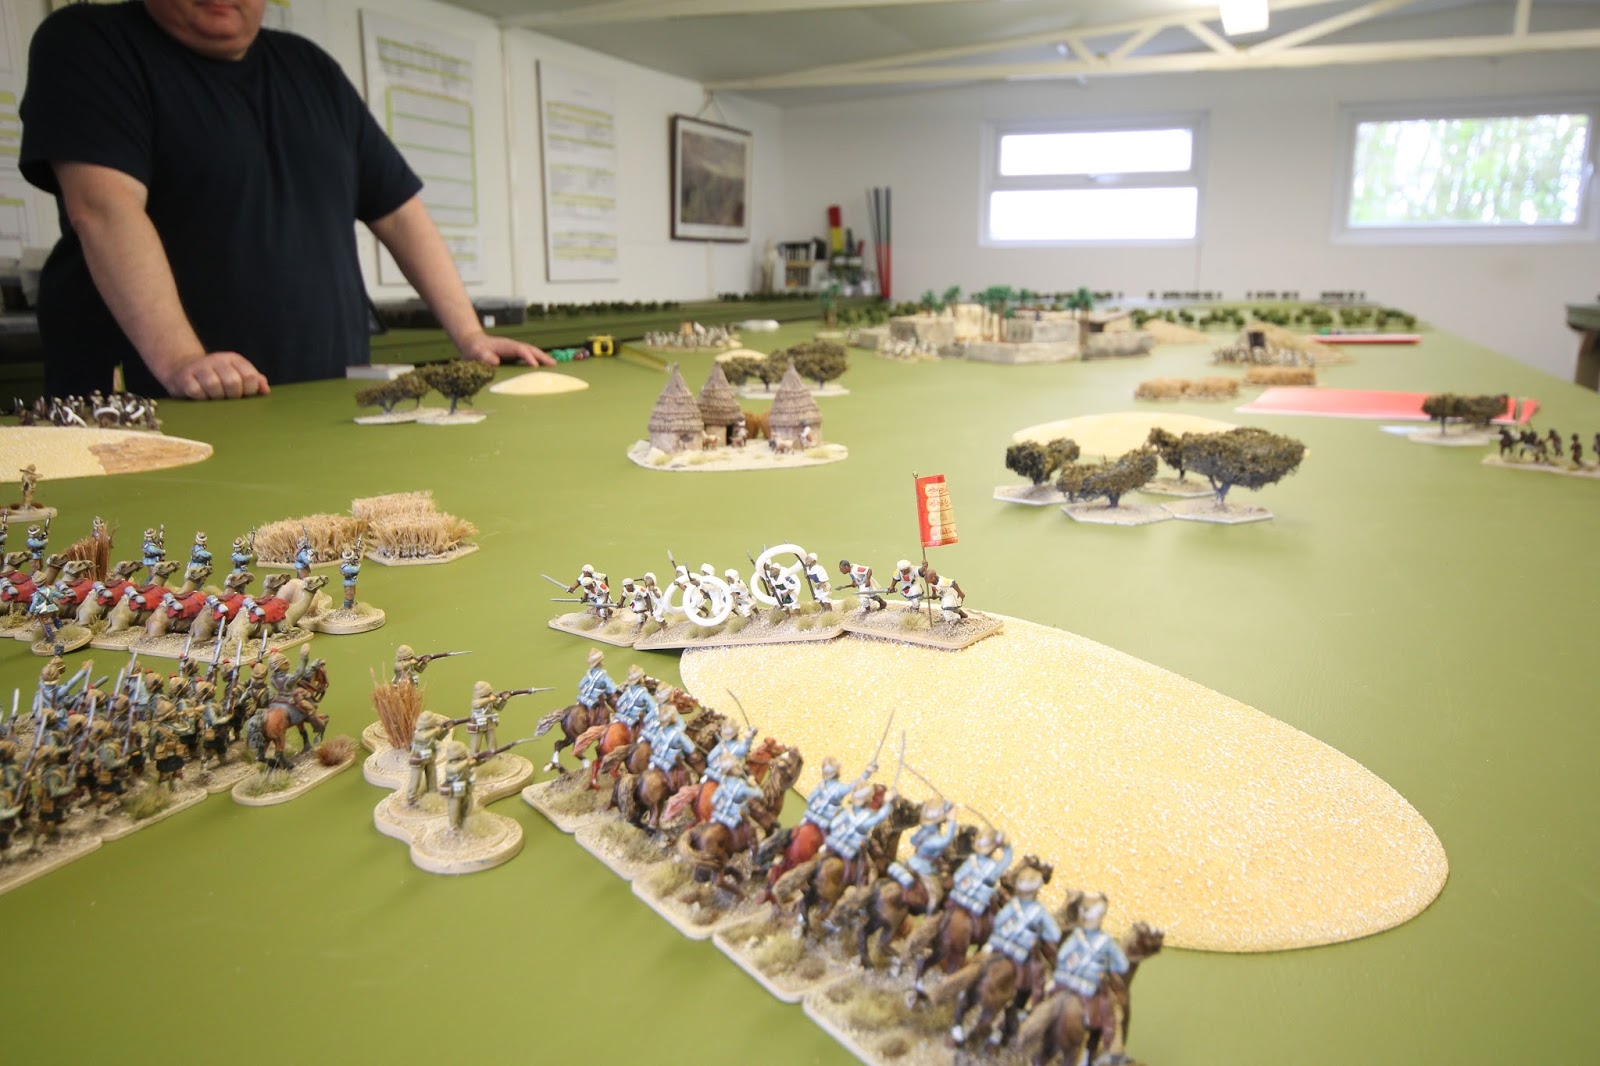
Spearmen erupt from behind a hill. The right flank cavalry, Hussars, deploy. They would charge and drive these heathens back. 


The garrison came under attack from the hordes led by an Emir. The Egyptian company defending that quarter of the village succumbed to the man. The defences were breached. Would relief arrive in time?


The relief force is half way there. The infantry are still in columns in an attempt to move quickly. Skirmishers have been deployed by both Btns to act as their eyes and spring any hidden ambushes.

 
This is approaching the climactic part of the battle for the relief force. A sizeable spear armed force are advancing on the main British line. This force would be led by an Emir


The enemy highpoint at Junda. As the enemy regrouped after wiping out the Egyptian company, the Egyptian nerve held and controlled volleys and change of circumstance (a ruley thing) saw the attack falter. The defence would stand!! The surviving spearmen would rally with the Emir and attack the relief force.

 
This was immediately prior to the main attack. Some smaller Arab formations were thrown back and then the main line deployed.
 
 
Now, everyone should buy the rules. The machine gun mechanics are really quirky. It can fire between 1 and 20 rounds. There are mechanics for it jamming. If you fire say 10 rounds, roll a single d20. If the roll is above the number of rounds you are firing, say it was 11, then the machine gun has fired all 10 rounds safely. If the d20 roll is lower, say you rolled 6, the machine gun gets to fire the 6 rounds and then jams. Jammed machine guns need to be cleared and this is not guaranteed!!!! You can see the risk in firing a large number of rounds!!

 
The climactic attack. The Emir would lead an assault. The previous round had already seen withering fire poured into the mass, killing 350 men.
This turn would be brutal!! The machine gun would fire and this glory was given to Steve (with an appropriate smirk on his face). He would fire 19 rounds!!!!!!!!!!! Having averted my eyes away for the d20 die roll, Steve proceeded to roll 20. After a few jigs on the spot and some giggling (not sure Officers did this, but he  was supposedly the Egyptian commander), hoards of spearmen were moan down as the machine gun fired its 19 rounds, didn't get jammed and then the supporting fire from 2 Btns and a battery of screw guns added to the slaughter!! that's just 525 dead!!!!
Just to add insult, the spearmen were charged in the rear by the Bengal Lancers.
 
Well, there you have it. Great fun. Some questions did arise and Dave will try to write all these down. My obvious queries are:.
the turn sequence needs a bit more explanation, especially charge declarations and when/how these are done in the sequence
Who pursues? What are the mechanics? When/how does this happen?
I think the cavalry v infantry engagements need "understanding" better from us. From how we played it, if cavalry attack infantry and get a big win, if the defender stands (not too difficult with an Emir) then the cavalry are minced. I'm not too bothered about the frontal charges, but am about charging the rear. I think we are going to try some mechanics where the cavalry, for large victories (whatever they become) get the chance to break off. It is just a musing at present.
We are also going to look at a morale system for both sides that expands what is already there. No doubt Carlo will be involved in all of this.
But in a nutshell, it we have been captured and enthused by our first experience. Onwards to wherever the desert goes!! 


Sunday 17 April 2016

Game 41 : Borodino Centre : playtest for 2017 game

This was Borodino again. In 2017 it is planned to have a larger game on about 800 square feet of table. This was part of the playtest I wanted to do. The game needs to last 3 days at a minimum. I chose to do the central section, from the Kolotcha stream down to the start of the woods after the Fleches and before Utitsa. These areas are subject to a separate playtest.
The forces involved were substantial, in the area of 20,000+ figures fielded.
Main combatants were for the French
Davout, Ney, Junot (1 Division) and 3 Reserve Cavalry Corps. The Guard were in reserve. For the actual game, certain conditions will need to be met to allow the Guard to be released.
The Russians were based on Raevski, Dokhturov and Borodzin plus the equivalent of 3 Cavalry Corps. A large battle! Everyone should know the battle, so below are a series of pics with a simple caption/legend
 

Looking out from the Great Redoubt to the woods to the west


Looking from the southern Fleches. The woods from the previous pic can be seen in the far distance

 
This is an assault by Ney and a Division of Davout on Semonovka village which is just to the left of the pic


This is the same attack but now viewed with Semonovka just to the right of the pic. This was a major attack supported by all arms.


 A screening/containing attack on the Fleches. This would get wrecked and was reinforced to keep the battle going.


French light troops are trying to scree/skirmish the redoubt. The French would lose a lot of men against the Redoubt without success. It was clear, in the playtest, that the Redoubt is indeed a pivotal feature upon which the Russian defensive line is hinged. 


French Reserve cavalry pouring through between the Redoubt and the left flank of the attack on Semonovka.


Prelude to a storm. The attack on Semonovka about to go in.


The Reserve cavalry from both sides clash between Semonovka and the Redoubt. In all, over 16 regiments, mostly heavies, would get involved.


More of the above


The initial attack on the Fleches is repulsed by Russian Grenadiers. More assaults would follow and the Russians would become exposed eventually.


The next French assault on the Fleches succeeds in suppressing the guns and forcing the Russians to defend from the rear.


A French Division attempting to outflank the Great Redoubt which is to the left of the pic.

 
The attack on Semonovka viewed from the French side.


The cavalry clash between Semonovka and the Great Redoubt viewed from the French side.


More of the above


The Russian view from the Great Redoubt. It would remain in Russian hands with only light casualties.


More cavalry join the fray. Anyone see a spare horse?
 

A different view of the French division trying to flank the Great Redoubt. Russian infantry from behind the Redoubt would thwart this attempt with horse artillery support.

 
And finally, more cavalry charging backwards and forwards to glory!
To conclude, the playtest worked well and the game easily lasted 3 days. The action was non stop and results were unpredictable which bodes well. The Russians held the line but were hard pressed. Final reserves available would have been the French Guard and the Russian Guard, less the Cuirassier division.
It wouldn't be normal without the rogue's gallery again or the lucky general gathering!


The guys are all regulars, I still think Iain, on the right, appears to be smiling about something that none of the rest of us can quite see!?!?
 
Next stop is one for Carlo down in Aussie: "Sands of Sudan" 28mm figures, strewth, the relief of Jandu!!!!


Tuesday 12 April 2016

Game 40 : Prelude to Smolensk

This is a very short report on another test game we played. At the end of May, we plan to pay a game set in early 1941 on the Eastern front. The idea will be to pitch a German Panzer formation against a Russian defence based on infantry divisions and tank divisions. This was a playtest  of the game. The force composition was a single Panzer division for the Germans and a partially dug in Russian infantry division. The Russians would be reinforced by a Tank division, the Germans receive no reinforcements. We included an air component, more advantageous to the Germans and the Russians had a few Force composition choices to make, each with their advantages and disadvantages. 
 
The big mistake I made was to forget taking pics. Big mistake. So, I've tried to show the OBs for each side on the Excel layout I use. If you can read it great, if you can't then I have to leave it to your imagination.
Either way, you can see that all the kit has a colour coded label and this is reflected in the sheet. The first sheet is German. Give one sheet to each German and they just keep tabs of their allocated troops. Add a double side laminated reference play sheet and a double side laminated weapons sheet and that is all the paperwork required. Its a method I've used since 1993 and it still holds up well. Its even better when I spend more time laying it out on an Excel spread sheet and maximising font sixe to A4 page. The things we do when we have time on our hands.
 
The Russian forces have a triangular infantry division and a tank division with two tank brigades, each of three tank battalions. One brigade is made up of T26s, the other brigade has a full mix of tanks, KV1, KV2, T28, T26. There is a recce btn with BT7s and so a lot of variety.
 
 As I said, a short and sweet report. I didn't want to ignore the game as it still took a weekend to play. But apologies for the lack of pics. I will rectify that for the next battle which I will report on this week
The battle was a good game with respect to seeing what happened when both sides were utilising the full length of the table (24'). There were spaces everywhere. The Germans managed eventually to gain a tactical advantage but it was close as the loss ratio for both sides was about even. The Germans were attacking, and no matter how good you are, you will always take losses on the attack. The key is the balance between persisting with the attack or halting the attack to regroup and then redeploy if need be and go again. The table space allowed this to happen and it worked well. As usual, a good time was had by all.
 
 
And finally, its never complete without the rogue's gallery. There was a new player to our merry men, Tony who is on the right hand side. An experienced gamer, his input is very valuable as WWII is an area where he has done an awful lot of research. Just retired from the Army, so he tends to know what he is commenting on!
Next stop, Borodino playtest, 1812!!


Tuesday 5 April 2016

Game 39, Supagame 1 : Kharkov

This game was the madness that was played out in a hotel in January. We had 20 players and about 600 square feet of table. We were in the hotel for a whole week. It was a two part game, reinforcements and repositioning occurring during the week. The games in the hotel, this being the first one, are being called  "Supagames" and it is hoped it becomes an annual event.
I hope the post illustrates the size and scope of these big games when played with good kit on good terrain with enthusiastic players.
The pics are in chronological order but it would take far too long to try and explain all the action.
That will have to wait until I publish the WWII rules as part of this game. The idea is to have a book with the rules and the whole planning sequence of this game; kit, terrain, OBs, player planning etc along with a commentary of how the game played.


The above are the three tables. Each table is 32.5' long and 6' deep, a playing area of about 600 square feet.
 
 
This pic gives a good idea of player density per table. Space was plentiful as the game utilised all the tables simultaneously, a result of deployment and flank marches.
 
 
I've included this pic as it shows how hidden deployment is done. Numbered markers go on the table and then the kit is placed on the numbered squares on these boards. It does away with the need of maps!!! The on table markers are numbered on one side and plain on the other so that although the other side can view the overall forces they are potentially facing (treat it as top level intelligence), they cannot see the detail. I've taken this system from guys called Grant and Craig who have their own rules called Cornish Combat Command. 
 
 
In the immediate foreground are two of the said on table markers. These are Russian markers.


The caption should read, "is this sheet the right way up?" or "in which building have they hidden the money?"
 
 
This shows the maximum player density, you always need to take care in big games that the action is well spread out.
 
 
Not sure what to say about this one! Attempted camouflage? Pleading for assistance? Laying down the law, literally?!


Two closer style shots showing the action. We had areas of fluid battle in the open, assaults on dug in troops, fighting through villages and woods, the lot!
 
 
The air forces were also there. Each side had about 20 aircraft each, organised into missions.
 
 
I like this pic because it shows a nice model bridge that is the centre of attention of both sides. The Russians would eventually secure both sides, after a week of fighting!!


More general action. All the pics were taken whilst the action was taking place. I mention it so you can note that the use of status markers is minimal. Again, you have to be careful that you don't have a myriad of markers or paperwork on the actual table otherwise it detracts form the spectacle.
 
 
A pic looking up to Kharkov. The Russians never go there, but not for a want of trying. The bridge at the bottom of the pic would survive in German hands until the last day.
 
 
This is the action on the other approach to Kharkov which could be seen in the background of the pic before this one.


Just a pretty battle scene.
So there you have it, lunacy enjoyed by the masses. The gaming was good, it all worked well. The players all played in a good spirit and had a great time, win or not win. Difficult to say there are losers when the event was such a success.
 
The "Supagame" for next year is Borodino 1812. Table size could be up to 810 square feet!! And figure numbers ?!?!?!? I now need to lie down!
Enjoy