Monday 9 November 2020

Game 87 : Waterloo

 Hi Guys,

It has been so long since posting, the Blog software has been updated! Well, the first week in October saw a game take place that had been a long time gestating. Waterloo!!!!!!!!!

It also coincided with the final British Allied figures arriving, the Dutch Belgian Cavalry. The battle of Waterloo is going to stay on the table until at least a couple of games in 2021, hopefully January. I hope to get the next game in during December. Fingers crossed!

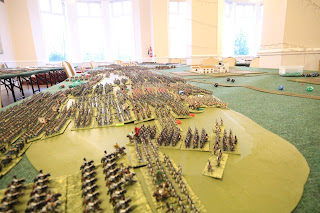
Waterloo needs no introduction and I'll just post some nice pics of the action. Being rusty, the Allies especially made a hasty deployment which had a pronounced affect on the outcome. But, as always, a great game.

The pics are in no set order. This shows the church at Plancenoit, the Prussians approaching from the right. The pic below is anopther of the initial action at Plancenoit with two of Bulow's Brigades committed to the attack. The defenders are Lobau.

The action at Plancenoit can be played as a separate game, as the action to either successfully seize or defend Plancenoit is quite protracted. In our first attempt, we didn't get past the first assault. Handbags all round!

Hougoumont is immediately to the left of the pic. Bachelu is middle left climbing up the ridge to their front and left. Duhesme, the Young Guard, is the block of infantry in the central position

At the same time, Foy has crested the first ridge and will soon have to repulse repeated cavalry charges. Immediatley behind Foy is Friant with the Guard Grenadier Division. The cavalry to the left is the Corps of Kellerman. LeFebvre is also present with the Guard Light Cavalry.

A close pic of Foy advancing forward over the first ridge. Artillery is also being brought up in support.

These are Dutch Belgian troops, in square, as French cavalry and infantry crest the ridge. Hougoumont is to the right and foward of the pic.

This shows the Guard advance from the British position astride the Brussels road. La Hay Sainte has been captured. Friant is to the right of La Haye Sainte. Quiot is the left of La Haye Sainte with Morand immediately behind. British battalions await the onslaught!

No write up would be complete without a pic of Hougoumont. The main "Chateau" is to the left of the pic, this shows the extensive size of the gardens and the woods on the approach path taken by the French.

Another pic just to emphasise the size of the Hougoumont feature. Jerome had the task to clear Hougoumont, British Guards supported by various detachments were defending the area. Hougoumont fell on the last turn!

Milhaud's cavalry advancing to the ridge to support the manoeuvre of Morand and Donzelot.

It was an excellent game, the French deployed historically, the Allies not far off. On the French side, Reille took heavy casualties in making the ridge and holding until the Guard, completely fresh, appeared. Jerome, especially, had high casualties amongst the best line Division in the army. Allied losses varied with the Guards taking heavy punishment. 

The next few games will also be Waterloo. With the old rule of 6, we were 4 gamers and Anne and the painter and decorator! We'll see what happens next! Keep safe everyone.


Friday 27 March 2020

Games 85 & 86 : Salamanca & Villafranca

Generals, January saw our 5th weeks game at our local hotel. The games we fought were Salamanca and Villafranca.

This also sees all our Generals bunkered down to try and avoid the Pandemic. Everyone keep safe!

Back to the games, Salamanca needs no introduction, Wellington and Marmont marching in parallel and then Wellington attacking. "Greater Arapiles, Lesser Arapiles & Los Arapiles".

Villafranca is a made up game, primarily to sow confusion in both sides as to the composition of their opponents although they had a good idea of the make up.

Rather than go through the games, I've posted various "action pics" with a small account describing the pic. One day I may get to write the battles up in a proper book/booklet.


The pics are in no particular order. The pic above shows a French Division launching an attack up the Lesser Arapiles at the point where the Allied line turns 90 degrees. The supposed weak point.


The attack is continuous to the first one with another attack to the left of the French Division above. This was a concerted effort to split the Allied army at its weakest point.


A longer shot, showing the British, in the foreground, attempting to turn the French right flank. The British led with the Guards Division, fighting in column!


This is a shot from the Villafranca game, usual thing, a village attracting a lot of attention from both sides. The battle for this particular village lasted 2 gaming days!


Believe it or not, this shows part of Viallfranca with a whole Spanish Division managing to get to grips with a French Division, without being in disorder! The Spanish would go backwards and forwards, but generally forwards, fighting a good battle.


About the only major cavalry only action during our whole week. Not surprisingly, it ended in a draw


This is near the centre of the line at Villafranca. The British are counter-attacking in this sector with all arms.
Just a taste of our experiences on a 33 foot x 18 foot table. We were 20 players and this year we nearly all managed to stay well at the actual game (a couple of wounded defaulters) and a good time was had by all. Next year is likely to be Waterloo, but we'll have to see how this world pandemic affects things.
Everyone stay well!


Wednesday 15 January 2020

Games 83 & 84 : Quatre Bras June 16th 1815

This was our first game using British and Allied troops in the 1815 campaign. It was fought with a Brigade structure for the armies along with all our current rules on skirmishers.


The above is looking north from Frasnes. You see the farm and then Quatre Bras. I use the fields to control the visibility because it is difficult to reflect exactly the limitations in local visibility that existed.

The above is looking from the north where the Allied reinforcements will arrive. Yo can see Quatre Bras and the woods to it's immediate right. The game was fought twice, the usual of playing it one way and then turning it around. Both games were played with similar tactics so the following pics relate to the first game only.


The French assault the farm as soon as possible, ensuring that the bulk of the forces bypass the farm and don't get slowed down waiting for it to be cleared. Essentially, the Allied use the farm as a road block.


Having cleared the farm, the French are now advancing on Quatre Bras directly. Jerome's Light infantry heavy Division is deploying in front of the woods and driving through them. The Allies have responded with a hastily organise gun line supported by the Dutch Belgians, hoping for reinforcements to arrive in time.


The French deploy for the attack once the farm has been secured. The fields are doing their thing in limiting visibility. The French have to be careful not to attack in a piecemeal fashion, the consequence of which is more time for the Allies to bring up reinforcements.


The assault on the main wood to the west of Quatre Bras gets into full swing. It is defended by the Dutch Jaegers who put up a spirited defence before succumbing to overwhelming numbers.


The Allied line to the east of Quatre Bras comes under sustained attack and is also being flanked by the French attack in the centre.


The direct pressure on Quatre Bras builds inexorably. The Allies prepare a second defensive line with British troops, predicting the expected demise of the forward Dutch/Belgian troops.


The French have secured the large wood and so are able to advance on this side as well with a secure flank. French Heavy cavalry have also now arrived as another potent attacking force.


A pic showing the general French advance and the assault on Quatre Bras. All French formations are on Advance orders. Will the Allies hold?


The fighting intensifies. The French are even throwing cavalry into the fray which is forcing British troops into square for protection, not only from the cavalry but from Dutch/Belgian troops being driven back.


The climax of the battle. The Allies are forced to relinquish their hold on Quatre Bras. They are not broken, but neither can they launch an effective counter attack. The game was called shortly after this pic was taken and the game was "turned around". Below are the casualty tables for both games.


Game 1
French Formations
Losses %
Allied Formations
Losses%
Infantry
Cavalry
Artillery
Infantry
Cavalry
Artillery
II Corps : Reille
-
-
3
I Corps : Pr. Orange


5th Div : Bachelu
-
-
6
1st Div : Cooke
-
-
0
1st Brigade
19
-
-
1st Brigade
3
-
-
2nd Brigade
20
-
-
2nd Brigade
0
-
-


6th Div : Jerome
-
-
9
3rd Div : Alten
-
-
0
1st Brigade
9
-
-
5th Brigade
11
-
-
2nd Brigade
5
-
-
1st Han Brigade
1
-
-


7th Div : Foy
-
-
28
2nd DB Div : Perponcher


1st Brigade
12
-
-
1st Brigade
26
-
13
2nd Brigade
9
-
-
2nd Brigade
9
-
0


2nd Cav Div : Pire
-
-
21
Bruns. Div : Brunswick
-
-
6
1st Brigade
-
22
-
Avant Garde
11
0
-
2nd Brigade
-
24
-
Light Brigade
11
-
-


Line Brigade
20
-
-
IIIC Corps : Kellerman


11th Cav Div : L’Heritier
-
-
0
DB Light Cav : Merlen
-
44
-
1st Brigade
-
43
-


2nd Brigade
-
20
-


Reserve Corps


12th Cav Div : D’Hurbal
-
-
13
5th Div : Picton
-
-
0
1st Brigade
-
0
-
8th Brigade
7
-
-
2nd Brigade
-
25
-
9th Brigade
27
-
-


5th Han Brigade
1
-
-

Game 2
French Formations
Losses %
Allied Formations
Losses%
Infantry
Cavalry
Artillery
Infantry
Cavalry
Artillery
II Corps : Reille
-
-
13
I Corps : Pr. Orange


5th Div : Bachelu
-
-
6
1st Div : Cooke
-
-
4
1st Brigade
10
-
-
1st Brigade
0
-
-
2nd Brigade
17
-
-
2nd Brigade
0
-
-


6th Div : Jerome
-
-
0
3rd Div : Alten
-
-
0
1st Brigade
8
-
-
5th Brigade
5
-
-
2nd Brigade
0
-
-
1st Han Brigade
0
-
-


7th Div : Foy
-
-
3
2nd DB Div : Perponcher


1st Brigade
3
-
-
1st Brigade
35
-
19
2nd Brigade
4
-
-
2nd Brigade
24
-
22


2nd Cav Div : Pire
-
-
4
Bruns. Div : Brunswick
-
-
0
1st Brigade
-
24
-
Avant Garde
10
0
-
2nd Brigade
-
5
-
Light Brigade
0
-
-


Line Brigade
0
-
-
IIIC Corps : Kellerman


11th Cav Div : L’Heritier
-
-
0
DB Light Cav : Merlen
-
7
-
1st Brigade
-
6
-


2nd Brigade
-
6
-


Reserve Corps


12th Cav Div : D’Hurbal
-
-
21
5th Div : Picton
-
-
23
1st Brigade
-
8
-
8th Brigade
2
-
-
2nd Brigade
-
7
-
9th Brigade
9
-
-


5th Han Brigade
0
-
-


In both games the Dutch/Belgian infantry fought quite well and duly suffered high casualties amongst all arms. The game was enjoyed by all, the nuances of using 2 rank infantry taking some time to get used to.

Here we all are enjoying the crisp December weather! Our next jaunt will be in January at a local hotel where 20 of us will be fighting Peninsular battles for a week. I'll give a short report after the event and also after recovering from 20 players for a week.