Tuesday, 1 November 2011

Game 4, The Battle for Krasnoe

This was the fourth outing and was a weekend game. It was set as an encounter battle in late Autumn 1941. The German forces were based on a Panzer & Motorised Div with some Corps assetts. The Russian forces were based on 2 Tank Divs, 2 Infantry Divs and some army assets.
The basic task of each side was to control the central town, destroy the enemy and be in a fit state to pursue victory. People often ask about victory conditions as opposed to "just kill the enemy". My view is that after game setup it is intuitively obvious what the victory conditions are, to the point where the actual gamers themselves concur on the result.


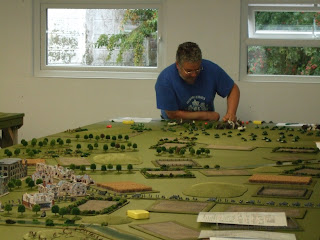
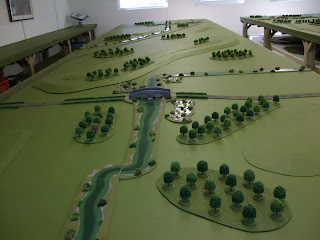
The first 2 piccies show the general layout of the battlefield. The Germans would be advancing from the right of the picture and the Russians from the left (that's what they were told anyway!). The town would be fought over the whole weekend. A pleasing aspect for me are how the rules play depending on the terrain. In close, well protected, terrain like a town, combat becomes protracted and the skill is in committing just enough troops to capture the objective. It becomes all too easy to allow troops to be sucked into a "vacuum cleaner". However, the contrast is striking in fairly open terrain as the manoeuvre becomes the key to success. It all fits my view of WWII warfare.
The next piccy shows the combatants.


There are two new faces, Phil Vernon on the left and Paul Hookway on the right. Then we have proof of the illicit love affair between Brendan and Adam!!!!!
Getting on with the action, the game started with both sides having forces near the town. The Germans had the Motorised Div and the Russians had 2 Infantry Divs and artillery. Both sides had to use some forces as reinforcements and the roads running the length of the table were where these troops would arrive. The Germans split their Panzer Div into two (no real other choice) and the Russians used a Tank Div at each end.
The game would effectively get split into three actions, the fight for the town and two flank actions where the armour of both sides were trying to break through to the town and at the same time stop the enemy armour from doing likewise.
The next piccy shows action in the town.


Both sides committed about half of their forces facing the town, into the town itself, whilst the remainder tried to probe the flanks of the town. The town had buildings that had three types of defence level. In the centre were the strongest buildings, then moving out to strong buildings then the weaker buildings in the outskirts. Fighting for "concrete" type buildings takes time and planning and not an unsubstantial amount of luck!


A shot of Adam at the far end of the table trying to work out how he will cope with the hordes of Paul's armour. This fight would eventually see the Russians gain the advantage but not quite releasing armour to get to the town. In terms of game play, it is difficult to "decide" to send troops away, in this instance to the town, when you are under attack from a force that you don't know if you can beat if you use all the forces! At the other end of the table is Phil asking, "can he do that?" Another good aspect was that this was the first game for both Phil and Paul and they picked up the mechanics fairly quickly.


Brendan at the other end of the table fighting Bryan with an expression of "what the f**k do I do next". This part of the battle would see the Germans gain an advantage, but again struggle to get any troops to the town. The Russians did manage to get some Recce (just for Brendan!) and light armour to the town itself.


Graham and myself fighting over the ownership of a fly in some central plaza? (I've no idea what we're looking at!). Bryan in the background looking for sustenance (tea!).


These are two aerial shots taken from our Reconnaissance expert Anne, it shows exactly how easy it is to lose whole formations in a town. The buildings I think are quite exquisite for this scale, they all come from Fieldworks and are painted by Rumbling Guns. For the next outing the town will be three times the size!


I think this piccy should be called "Deja Vous"! Where and when have I seen this expression before. And he works in a bank!!!!!!!!!! At this point he retired to the kitchen to help Anne cut the bread for the lunches. Something he did do very well!
Well, the result. The fight on the flanks tied up most of the armour from both sides. In the town, the Germans were slowly getting the upper hand, no small part due to a devastating Stuka strike on Russian infantry on the flank of the town. Without this luck, the town would continue to be a grind.


One last piccy of the central area. The Germans are making headway towards the right top of the piccy as you look at it.
That's it for this jaunt. The next game will be a biggy again with even more terrain. More woods will also be on the table and the river may make its comeback!

Tuesday, 6 September 2011

Game 3, The Rostov crossing

This report is from the third game at the Situation Room. As each game is played, I try to expand the forces used and make the games have different themes. The obvious reason is that it remains challenging to the players, many of whom are regulars, but also to push the "envelope" on the rules.

This game was different in that it was the first time that I had buildings. It would introduce town fighting and demonstraste the ease, or not, of taking towns from the enemy. The town was in the centre of a road and river complex which would make any attack, by either side, in the town difficult.

The forces used were the largest yet, the game could last up to 4 days, but it was becoming clear what would happen after 3 days and the game finished. The game was set in latish 1942, inspired by Manstein's counter attack at Kharkov.

The German side was based on a complete Panzer Corps of 2 Panzer Divs, a Motorised Div and some Corps assets. The assets were a Flak Btn, a Machine gun Btn and some Corps artillery. The Russian side was based on 3 Infantry Divs, the armoured component of 4 Tank Corps with some infantry support, 2 Artillery Divs and army assets consisting of 2 reconaissance Btns and 2 Independent Tank Brigades.

The game was defined as a Russian breakthrough trying to reach the town and control the river crossings, road network, town and be in a position to defend the objectives. The Germans were trying to do the same. Initial set up had the German assets only, deployed anywhere on the battlefield. After this was done the Russians were able to deploy. The Russians had restrictions on the number of formations that could be deployed at any one time and the remaining were off table reserves.
The rest of the German forces, the Panzer Corps itself, had to arrive on the battlefield using the road network and arrival at a particular road was adjudicated on a random basis. Furthermore, only the Motorised Div was available on the first day.

The German setup was done by 2 players, the other 2 players arriving first thing next morning. To create a fog of war, the players deploying were able to order where the Mot Div arrived but the arriving players had to determine where the Pz Divs arrived. They had to do this based on intelligence. This was derived from allowing them to walk into the Situation Room, walk up and down the tables once and also use any cameras they had available. They then left the room and had to plan from this information alone.
For the Russians it was much the same, 2 players did the setup, but 2 arriving players had to determine exactly where the forcers they had been allocated were ordered to go but without any cameras.
The basic result was the Russian deployment had a very heavy infantry right flank and very heavy armoured left flank. The Germans were using a classic pincer movement from the flanks, the Pz Divs doing this hoping that the Russians would have advanced into a "pocket" for them to cut off.

So the game started with the German Flak Btn and MG Btn in and around the town, including a small force on the eastern side of the river. The German plan was to get engineers to bridge or cross troops to reinforce and suck as many russians as possible and close the trap. The Russian paln was to try and eliminate the German right with their armour and hold the centre and right with a gradual infantry advance.
Without going through a blow by blow account, the following are snippets from the game. The next picture could well be titled, "how do I get out of this?"


That's me, not so much scratching my head, but doing an impression of a cow pat. I've arrived with the Motorcycle and most of the Reconaissance Btns from the Mot Div on our far right. Facing me is all of the armour from the equivalent of 4 tank corps!!!!!, or the flies round the cow pat.
I'd eventually lose all the Reconaissance Btn but survive with 2/3 rds of the M/C Btn in a wood and eventually advance again!!!

The ring of steel facing me. My command would end up in the wood in the centre of the picture with all armoured vehicles destroyed. But I had held up virtually all of the Russian armour for over 2 days of gaming.

Elements of the Mot Div reinforce the town from the west, passing 88mm AA guns from the Flak unit that were deployed to cover the bridge approaches.

Rusian infantry on the east bank of the river. Neither side would fight their way over the river, close fighting is difficult and deadly and both sides were "happy" to stay "safe". If you want to take a sizeable town, then you have to plan with adequate support in the form of artillery for suppression of the enemy and smoke to mask your initial assault points. Without this, taking towns is very difficult and the option of screening the town becomes a real choice as it certainly will require fewer of your own men.

A Russian Artillery Div under air attack from a Stuka. The artillery were saved by the judicious placement of an AA Btn that successfully drove off the Stuka.

 This is action from the German left flank. In the foreground, in the wood, is a German Mot Regt from the Mot Div, fighting its way through a Russian Regt. In the background, the other 2 Regts of the Russian Div can be seen. The German advance is attempting to "shepherd" the Russians into a pocket. Later on, to the left of shot, a full German Pz Div would arrive.

This is a closer shot of the previous picture but taken from the Russian side. Eventually, the Russians were forced out of the wood.


Adam lamenting the destruction of a Marder. We learnt quickly not to assign many vehicles to Adam, not unless you liked toast!!!! (his first trick was to advance on Russian infantry with 20mm AA mounted on trucks!!!!).


This is the Pz Div arriving, supported by a Stug Btn and Tiger Coy. It is attempting to drive along the road, southwards. If it can reach the bridge in the distance, it will cut off 2 Russian infantry Divs to its right flank. In its path is the Russian Reserve armour based on 2 Btns of KV 1Cs.

This is a closer shot of the Russian reserve armour. In the background you can see smoke, this defines the battle where German armour attacking northwards is trying to close the trap and cut off all the Russian armour as well.

This is a shot from the western angle looking at the German pincer moving northwards. The game would end shortly after this, it was clear that the Russian infantry would be caught but it was a distinct possibility that the Russian armour may be able to escape. Another day would tell but most players were exhausted by now. So we played ships...........!

Lastly is a mug shot of all the gamers. Anne took the piccy and kept us in supplies throughout our 3 days of gaming. There is 1 newbie, Nick Miles on ther bottom left, Steve's twin brother (top right). Nick was one of the flies that were trying to flatten me into a cow pat!

In the next week or so I will do a new post, specifically on the rules. Some comments have been asking about these, including their availability. I will go through some whys and wherefores including how we use trucks for transport and more importantly the profound affect it has had on games.

Next game up is in October, smaller in scale so more space. Game after that is in Decemebr and it will be big!

Thursday, 23 June 2011

Game 2, the T34s arrive!

This was the second game at the Situation room. The theme is Eastern front as it will continue to be for quite a while. We moved to some time in 1942. German kit now had Stugs, Marders, Panzer IVs with long 75s and a company of Tigers. All this kit was centred on 2 Panzer Divisions.


The Russian armour was all based on T34s and T70s. There were 4 Russian Tank Corps equivalents and 2 infantry Divisions.
Overall odds were about 3:2 in favour of the Russians. The German morale/quality was as in the first game and the Russian morale/quality had been increased. The picture above shows the general layout.

The Germans had secured a bridgehead over the unfordable river and had to break out to the rear table where there was a confluence of the road network. Basically, cut the Russians off. The Russian task was to force the Germans back over the river.

Terrain wise, more had arrived. The battlefield had 55 fields, of various sizes and description, deployed along with about 20 woods. The new fields made the terrain "closer" and improved the "game" as visibility was interrupted more so that in our first game.


This view gives a sight of the far end of the table. It looks like they are all trapped in searchlight beams (or very deliberate thought)!
There were some new crew members to this game and the rogues gallery is below.
 
Steve Evans is on the far left and is form Leeds. He's a nurse working in Sexual Health with teenagers, not sure what sort of gestures he's making to Anne's mum!?!?!?! or maybe Adam who literally can't be kept down. Adam is now the official Achilles heal of the local casino, he's on a winning streak at the moment. Second from the right is Steve Miles, forgotten what he does now but hails from Northamptonshire. A bit like Adam, you have to work hard to get him to drink two pints! Herbert is fifth from the left, another regular who will pop up more in the future.
 
As mentioned, this was the first outing for T34s and it did indeed make the game a lot closer. The Germans deployed with a Panzer Division for each flank, the Russians loaded their right, near the woods, with their armour. To give an idea of balance, the Germans had
3 Tigers
7 Stugs IIIFs
7 Marders with 76mm guns
24 Panzer IIIGs
12 Panzer IVF2s
4 Panzer IIFs

Russians had 52 T34Ds & 40 T70s.
Next is Pete's forces launching an attack against Herbert. This was to be the closest battle to call and would eventually decide who won the game.

This was the largest attack launched by the Russians. It was essentially attacking three of Herbert's battalions, a Panzer Btn, the Stug Btn and an infantry Btn. I think the telling turn came when Herbert killed a T34 and they failed morale along with a Stuka attack on some T70s. This was lucky as air is a random event and it was pure good fortune for the Germans that it arrived in the right place at the right time.

This is looking at Herbert's defence. At one point it looked like the Panzers were forming square! but his luck held out. The German infantry also won the battle for the wood against Russian infantry and it was after this turn that we called it a day.
There were some other humorous events. Adam informed us all that he had never eaten corned beef or spam (obviously a sheltered youth). So he bought some! The evidence of the corned beef is below.

The next day was to be the high point and final defeat. The server at the local corner shop where Adam bought the corned beef was so impressed that he had never eaten spam that he gave Adam a free tin!


The tin was duly opened, but unfortunately that was a mistake. As hard as Adam tried to eat a piece, as the spam got nearer his nose, his shade of green intensified.  In fact we all turned green as the small wafted towards us. Alas, the spam ended up as impromptu fertiliser for some flowers in the garden (and they are still alive).

Getting back to games, I could resist this piccy of Herbert examining some of the Napoleonic troops. I can imagine he was already working out a battle plan at some point.


And lastly, as an experiment, I 've added this video that was shot by my chief reconnaissance pilot Anne. This was done in between ferrying in essential supplies to keep us in food and drink.


The next game will be bigger again and will hopefully involve the first buildings that I hope will have arrived by then.


Tuesday, 26 April 2011

Grand Opening & Game On

Now we have our first ever game under our belt, which we played over the Easter weekend from the Thursday evening until the Monday afternoon. After months of planning and anxious thoughts about how things would look and play, it was a relief to get started. We were also helped by phenomenally hot weather for this time of year, not surprisingly alcohol consumption seemed to match!
The first piccy shows the actual cutting of the ribbon, yellow in our case from the bunch of flowers that Adam (you'll see him later) brought for Anne. It was only poignant that the opening honour fell to Anne, literally without her whole support and enthusiasm this project would never have happened!


There are no games without intrepid commanders and this game was no different. We had 3 a side for the first few days, Brendan would be an extra player on the Saturday. The next two piccies show the gamers and a "special guest".
Left to right is Bryan Anderson, a medic from Lincolnshire. His forte is falling over head first into the bath when he is drunk! (and I'm not kidding!). Next is John, my special guest. John is my neighbour and a through and through Yorkshireman. He is responsible for all the table build in the situation room and more. He started with the bare steel, welded the support brackets on, cut all the timber to length..........MDF........gluing............grinding.............lots of  grinding.... ..fixing..........levelling............redoing things to perfection............etc. He claims not to be a joiner, he may not be but he is certainly a genius!!!!!! Anyone who plays on these tables will be doing so only because of John's expertise and hard work!!! I did help a little, like stand there and carry bits and bobs, but the construction is really his.
Next is Anne who I constantly mention. Must be love or something! but we will have been married thirty years this August so maybe my infatuation is understandable (yes would be the answer). Then there is me with the booze in my hand (typical I hear people say). Then Pete Hogarth from Leamington Spa, trying to hide in the background, but being 6' 83" makes it difficult for him to blend in (and the ceiling inside is only just high enough!). Next is Gordon Hamilton, a Scotsman who teaches me bad drinking habits, now living in Derby working as a material testing manager (I think) in the local council. He's the only man I know who drinks in his sleep! (saw him do this on Easter Sunday). He'll claim he was only deep in thought, but I remain unconvinced. Lastly is Graham, another Scotsman from Edinburgh in the Nuclear power industry. We often associate him with a reputation of being able to point in a given direction and say "kill", a bit like a guided missile. You then sit back and watch Graham grind his way forward relentlessly, but in a gentlemanly manner!!!!
Lastly, again on the left, in the next piccy is Adam. He is one of our bankers from Cheltenham. We could only persuade him to drink half a lager in the pub (some suspicion that he was trying to stay more sober than us as a tactical move!).


No doubt they can all think of anecdotes to describe me, but they are all great guys! I should also mention who also did what in supplying figures, painting etc.
The WWII kit is all from Pendraken miniatures. It was all painted by Neil Sheardown who unfortunately couldn't make the game. The trees and hedges were supplied by S & A Scenics and all the rivers, roads & bridges (scratch built) were supplied by Andrew Saunders from Terrafirma Studios.

Now to get to the game. As a recap, the game is based on a German Panzer Corps (2 Panzer divs & 1 Mot div) trying to force a major river crossing on the road to Smolensk in August 1941. The river line is defended by 3 Russian infantry divisions and 2 tank divisions. The first terrain piccy shows the main river line as the Germans approach from the right hand side, making the nearer edge the German left flank.


The river is unfordable and there are only 2 bridges. The first bridge is at the far end of the table, just visible. The second bridge is to the left of this piccy on the other main table.


Unknown to the Russians, both German Panzer divisions had bridging columns so it was going to be a race between the Germans crossing at suitable points and the Russians trying to cut off the bridgeheads. All German troops started off table and had to arrive by roads. The Germans also had a restriction in that the Motorised Div wasn't allowed to cross the river.
The Russians could start anywhere on the table or keep troops off table in reserve. Reserves could pick their arrival road as they pleased, with some delay between electing to commit reserves and then arriving. Troops starting on table had chances of being dug in, more so if they were on their side of the river. The Russians only found out if they were dug in after a die roll and after they had deployed on a map.

Rather than try and give a blow by blow account, I have compiled some piccies that show action that was typical of the game.

This shows the German 5thPanzer trying to cross the river. You'll notice there is no bridge, this Div was using its engineers to try and force a crossing. In the middle ground you can see German infantry that has already crossed by dinghy and its engineering bridge column blown up on the river line. The Russians had elected a defence based on the actual main ridge line, the German infantry had to move quickly to minimise the artillery and mortar fire that they became subjected to.


This is on the far left flank and shows the German 5th Motorcycle Btn, with a Reconnaissance squadron, engaging Russians forward of the river. The German idea was to persuade the Russian to tie down troops against this feint, rather than recognise the main river crossing attempt.


Here we are all engaged and Brendan has made an appearance. The Russian left is secure, but the German bridging actions in the centre/left centre are making inroads.


A view of the intense fighting in the centre and left centre, near the main ridge line. German armour is now getting deployed to support infantry that has already crossed.

German Stukas attacking Russian tanks on the Russian right flank. Gordon became convinced that there was a conspiracy, because the first 3 times the Luftwaffe turned up, they always attacked Gordon (where they arrived was randomised).

This shows the last Russian tank counter-attack from the main ridge. It comprised a mix of T28s and T26s with some BT7s. The attack was halted by German Pak 35s supported by the odd Pak 38.


Adam senses victory, having secured the bridgehead and now also broken the Russian centre. The Russians are also contemplating the next battle to be held where they hope to reek revenge.


The commanders have broken for lunch to reflect on their tactics and plan their next moves. The next game will be in June, it will still be on the Eastern front and either later in 1941 or earlyish 1942. Depends on the arrival of T34s from the factories.


I thought I'd finish on the silly face and pretty face. Doesn't take much guessing to work out which is which!
The next item might be WWII Naval, we played 4 games as well over the weekend and I 'll report this in a separate post.

Tuesday, 19 April 2011

The Prelude

We are now very close to the first game in the Situation room. In the past three weeks, all the soldiers have arrived and terrain pieces as well. At this point, inspiration is required and this has been provided by Anne. Really just an excuse to put her piccy in again!
The soldiers were painted by Neil Sheardown and just required basing and dry brushing. Whilst doing this we also discovered Matt enamel varnish (as opposed to acrylic) which seems to work as ink in some respects. We discovered this because some tanks that arrived suffered the dreaded "milk" affect where the varnish has moisture in it and "goes off".
Recovery is simple, you paint more varnish on and as you watch the milkiness disappears. As we were using Matt varnishes, I automatically went for an enamel type. The affect is striking. The next two piccies show all the kit on the table, being worked on methodically.


After all the basing was completed, the rest of the terrain arrived at the weekend, lots of rivers, lots of road in addition to over 500 trees that arrived mid-week. As always, help is appreciated and at the weekend Anne's Mum was drafted into work to carefully position some of the trees.


To give an idea of what the terrain looks like, I've selected a close up shot of a small area and then two long shots that include both the tables. For this game, the small back tables aren't being used, one reason being that I've run out of terrain and it isn't actually needed as the table is huge!


Finally, there are two pictures with me in them, the first is a full length shot again to help show perspective. The terrain includes over a dozen hills, 60 feet of road, 60 feet of river and over 500 trees in 20+ woods.


Lastly, I couldn't resist some champagne. Technically, I should have waited but the excitement won through. Its odd having spent a year to get to this position and then to actually play a game. There still remains work to do. One technical issue remains, condensation, but this seems limited to one area and we have a fix if needed. It still surprises me how much water is still evaporating from the timber and the concrete. Then there is the carpeting of the floor and exactly how to do it.
But hopefully by Thursday we will be putting kit on the table. And I nearly forgot, the game!!!!!!
Its a WWII Eastern front 1941 game, based on the crossing of the Dnepr and driving on towards Smolensk. German forces are based on a Panzer Corps of 2 Panzer divisions and a Motorised division. The Russians are based on an ad hoc reserve army comprising 3 infantry divisions and a 2 tank divisions. We'll see how it goes.

Saturday, 12 March 2011

An Epiphany! Well I think it was one!

I've got an unusual title for this entry, more of that later. I thought I'd update progress on the terrain. The hills are now all done and I have enough material to do about another 40 of the things! Anyone short of good quality high density urethane?
The first piccy shows the main ridge that will be used for games like Waterloo, Austerlitz etc. It is 4.5 metres long, 14 1/2 feet for old imperial guys like me. It is in 4 parts, the centre sections being somewhat heavy and all the joins within a section have been biscuited and glued. When the whole ridge is put together, biscuits are used to help keep the centre sections aligned.
The main ridge is really a specialist piece and the typical large hills of which I have 2 are a more conservative 2.5 metres in length, about 7 1/2 feet.

These hills would be good for a Bautzen type game. In addition, I have about 15 other hills that can be used individually or some can be used to make a third tier for either of the above. That's how the sunken road at Waterloo would be represented.

All the hills and boards are simply painted. I then started to look at the texturing and dry brushing. I started with a small hill to see what it was like using masonry paint and fine sand (stuff used for goldfish bowls). The hills looked fine and I even tried a part of a large hill. Then I tried the main board on one side and it proved inordinately difficult. I couldn't get an even spread of the sand/paint mix and it looked really odd, even when dry brushed. So I needed to think on it and that same night I got out the first real Wargames book I ever read, The War Game by Charles Grant, 1971. And then the Epiphany (or madness as its a fine line between the two).
The Charles Grant book is an 18c battle and the terrain is very simple and simply painted, much to where I am now. The figures he used looked fine against such a background, clear bright colours and the fact that there was no texturing doesn't detract, if anything the opposite. Then I realised I hadn't taken all om painted figures and put them on a clear painted board with the hills. I know from my earlier days that 20mm WWII figures and kit "gets lost" in good textured terrain. Moreover, 28mm Napoleonics work with textured terrain because of the size of the figures.
So I tried the experiment of having the figures on textured bases, but on a plain coloured board. Its astonishing to me. I never realised that if I put the 10mm next to textured terrain, you begin to "lose" the figures "in the terrain". Put them on a plain board and the obvious change in contrast makes a humongous difference.
A friend of mine, Neil, was coming with supplies of tanks and then I thought I'd ask him.


The coffee is to recuperate Neil. Gobsmacked doesn't describe his initial thoughts! I'm just getting over his shock! He thinks its absolutely fantastic and I agree with him. The strategy is to now have the terrain a blank green, including hills and woods and keep the contrast to the figures, figure bases and some terrain like roads themselves and villages.

What do the figures look like? Well, we are still learning with the camera, but this gives you a flavour.


The Dutch Lancers of the Guard, 178 figures, easily picking out all the colours and detail, like grey horses for the trumpeters, the standard bearer, Colonel, plumes and even the cross on top of the Czapska.
Next is more terrain and WWII tanks.