Wednesday 24 November 2021

Game 95 : Auerstadt October 14th 1806 - take 2

This was the second time the game was played. We had different players, so it was interesting to see how things would go. Right from the start, the Prussian cavalry was aggressive. Here we see Blucher, on the Prussian right, immediately charging the French as they try to deploy from the road to make more space. It nearly succeeded!! but was beaten back.

On the French right, the solitary cavalry brigade advances to both try and slow down the Prussian advance but also keep the Prussian centre and left from linking up into a continuous line.

The cavalry fight in close up. The French Chasseur unit would drive the Prussian regiment form the field and so achieve the desired result of a gap between the Prussian forces. Gaps mean time taken to eliminate them, the French need time!

In the centre, the French advance through Hassenhausen and the enclosed garden. The movement is designed to delay, even further, Prussian attempts to launch co-ordinated attacks. Eventually the French would need to yield this ground and the garden so as not to be enveloped as the Prussians, slowly but surely, closed their front line gap.  

Back on the French right, the Prussians are now launching a full scale assault. The French do have a problem as Prussian numbers are allowing them to deploy on a contiguous front and this is stretching French numbers. The French cavalry are being forced to hold a portion of their line, it can't last forever.


The French hold their ground. On the the Prussian right, Blucher has regrouped and is advancing alongside infantry and putting a strain on the French left. Many French units are being forced into square, protected fine from the cavalry but then suffering under artillery fire. 

Fresh Prussian cavalry launch themselves against the French left just out of shot, pinning them in position whilst fresh Prussian infantry units advance to assault the flank. This would a close fight but the French would manage to hold the line. French casualties were mounting and beginning to reach critical numbers on this flank.

On the opposite flank, and at the same time, A Prussian assault drives home the attack. The French had just managed to reinforce the area from troops in their own centre and the controlled volleys of the French infantry saw this attack literally grind to a halt.

The last shot of the game tries to give a more panoramic view of the battle. The French are deployed on the right. I might see if a new lens allows more of these types of pics to be taken.

The casualty table is below. Casualties were heavy in this battle, Schmettau has suffered badly and Friant is reaching critical point. Another great game, and again the simple use of command and control rules for the various sides allowed the flavour of the battle to be replicated. 

French Formations

Losses %

Prussian Formations

Losses%

Infantry

Cavalry

Artillery

Infantry

Cavalry

Artillery

DAVOUT


DUKE of BRUNSWICK


Friant

22

-

22

Blucher

-

36

0

Gudin

11

-

3

Schmettau

29

32

20

Morand

6

-

13

Wartensleben

22

8

3

Lt Cavalry Brig

-

12

4

Orange

27

7

33

Reserve Artillery

-

-

13

Kalkreuth

14

17

0


It was cold outside, and wet, so we did the rogue's gallery inside. Next game will be Lutzen.

Tuesday 26 October 2021

Game 94 : Auerstadt October 14th 1806

 This battle is quite a challenge to make work well. The battle was made famous by Davout not only holding out against the main Prussian army retiring from Jena, but actually attacked the Prussians into a standstill. The result of his actions would result in the destruction of the Prussian army. In the past, the game has been played where the French are "very good quality" and the Prussians have a myriad of restrictions.

The challenge is to fight the battle but keep the troop abilities as they were and attempt to try and emulate the tactical battle by different means, namely Command & Control. The scenario allows the French to react faster than the Prussian commanders.

Now to the battle


This table shows the west most table where the Prussians arrive from the West. Essentially, the road in the centre runs from West to East and the Prussians need to force a passage along this road. The village of Rehehausen is in the foreground and Gemstadt and Poppel are in the centre of the table.


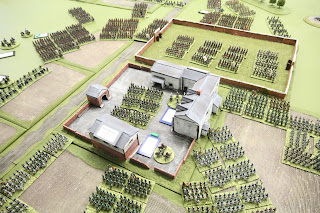
This table shows the east most table where Davout arrives. Tuagwitz is the nearest village and then in the middle is Hassenhausen. This village will become the "fulcrum" of the battle, its control is vital as the garden area just in front of it is a significant barrier to any troops approaching from the west.


A closer shot of Hassenhausen and the garden area. Most of the key actions would take place in this area. I should also add that there were some special rules. The main rules were that "column of attack" formed by column of divisions was not allowed. Column of attack with column of companies was allowed. In additon, the Prussians has a special cavalry rule. Any cavalry unit that started the turn in charge reach of a French unit had to declare a charge! The a d6 was rolled. 1 or 2 and the charge was cancelled and the unit could not advance. 3 or 4 meant the charge started. 5 or 6 meant the the charge could carry on or be cancelled, with no penalty, at the players discretion.


The Prussian army essentially had four major formations. One formation started in and around Poppel. I should have said that the game starts with zero visibility in fog, although it lifts quickly. This formation was Schmettau, a mixed force of all arms. Here you see it has deployed in front of Hassenhausen and to the south. This in turn forced the French to deploy a division to the south. The French forces were being stretched already.


The Prussians held back somewhat awaiting reinforcements along the road. The first reserve division was posted on their left. This took some time and in this time the French advanced through the garden in front of Hassenhausen to try and drive a wedge between the Prussian front line divisions. If successful, it would also have the effect of slowing down any troops trying to use the main road to advance into the area.


I included this as this was a single French Chasseur unit charging a Prussian Hussar Regt. I can't remember why it happened, except the Prussian cavalry rules had some part to play


In the meantime, the Prussians had planned how to attack the main French position. The French position looks imposing, but already the position is tricky as the troops in the garden cannot get out and so cannot effectively fight. They needed to pull back the bulk of their numbers and redeploy to the rear of the village.


Back to the brave French Chasseur unit. It won the combat and broke the Prussian Hussar unit. Bizarrely, it then pursued into the Prussian supports and there were a lot of them. This would be the end of the Chasseur unit, but not before it executed terrible carnage.


Schmettau's main assault has gone in and been repulsed. This is really a hiccup for the Prussians as they can trade looses against the French as they have twice the numbers. This was the first of three assaults against Hassenhausen.


The Prussian attack on their left swings in against the French right. The French would drive this back, partly through firepower but also through the Prussians struggling with Command & Control at key points. They would lose Command & Control at key moments and then suffer heavy casualties from French musketry 


The Prussian reserve, including the Guards form up at Poppel prior to assaulting Hassenhausen.


Schmettau launches his second assault against Hassenhausen. This would be fought off but the French were now getting sucked into a fight in the open. Time to really get these troops back.


The third assault is now being prepared. Schmettau is preparing to assault from the south, the Reserve from the west. The Prussian idea is to fight one side, then fight the other. It would stretch the French to the limit. It was becoming a very tight fight. The French were trying to disengage where possible and bring as many men the the village as possible 

The southern assault failed. The French were very lucky to unform the attackers as they charged in. The result was important as it reduced overall French casualties. The Prussians now through in the Guard. They won every round of melee but the French morale held.

We had now played about 32 turns. We planned on a maximum of 36 turns. The game was called as we all believed that the French would hold. Losses for some formations had been high and this is reflected in the casualty table. This was an excellent battle and the adaptations we made to fight the game worked out very well.

French Formations

Losses %

Prussian Formations

Losses%

Infantry

Cavalry

Artillery

Infantry

Cavalry

Artillery

DAVOUT


DUKE of BRUNSWICK


Friant

10

-

47

Blucher

-

13

0

Gudin

9

-

38

Schmettau

30

29

32

Morand

18

-

13

Wartensleben

24

0

2

Lt Cavalry Brig

-

32

25

Orange

2

2

1

Reserve Artillery

-

-

22

Kalkreuth

5

0

3


As usual, a mug shot of us plucky players. I'd played French and Graham and Pete had played Prussian. The next game will also be Auerstadt, but with different players, so it will be interesting to see how the battle plays. Now for more beer!


Tuesday 21 September 2021

Game : 93 Seven Years War, Lobositz - take 2

 This is a refight of Lobositz where Graham and myself have swapped around to play the other side.

The deployment for both sides was similar to game 1. The difference this time was that the Prussians deployed infantry into the vineyards on their left flank. This was to clear the woods of suspected Grenzers and so straighten the Prussian line and remove any hinge that was seen of game 1. Sounds easy! 

On the Prussian right flank, a similar approach was adopted. Form firing lines and firefight the village. It was to fix the Austrian left and also try to attrite them out of position with firepower. This was another tactic that sounded easy!


In the centre, the bulk of the Prussian cavalry deployed along with the Reserve infantry, the Grenadiers and a Guard battalion. These were to help the cavalry punch through the Austrian centre whilst both flanks were pinned by infantry attacks in firing lines.


In the centre, the Prussian cavalry launched itself against Austrian infantry squares and the main Austrian cavalry force. The results were some squares being broken into as some charges benefitted from artillery support fire. The Prussian cavalry outfought the Austrian cavalry but the latter did not break. The Prussian Reserve infantry is advancing to deploy to engage the Austrian infantry in the centre, most of whom are currently in square.


Some square hold, some are broken into. Some squares are broken into multiple times but still cling on.
The cavalry battle continues unabated but neither side breaks, but Austrian casualties are mounting.


The Prussian left is approaching Lobositz and most of the woods have been cleared. The Prussians deploy into firing lines and straighten the line from the kink you can see above.


Prussian Hussars launch themselves at Austrian artillery. They close but are beaten off.


The Austrians, on their right, in front of Lobositz, lose a cavalry combat but the Prussians lose an infantry battalion caught in flank by Austrian Hussars. Although suffering extensive losses, the battalion did eventually rally to the colours.


On the Prussian right, the combat at the village didn't quite go to plan. The Prussian losses mounted so the front line infantry had to be rotated out of the line. However, on the fringes of the village, Prussian artillery and infantry eventually started to force the Austrians back and sever the Austrian left from its centre.


In the centre, the Prussian reserve infantry has arrived and will deploy with cavalry support. The Austrian infantry in the centre would recoil from this attack and open up a gap between the centre and their right wing.


The Austrian launch one final counter-attack in the centre to attempt to stall the Prussian advance. It is unsuccessful. Faced with the Prussian Reserve infantry advancing still, with cavalry support, the Austrians issued orders to withdraw before any significant numbers of troops became cut off.


We forgot to take our photo outside, so this is in the pub. Graham's is a pint of Camerons whilst mine is a pint of Old Peculiar. The losses chart is below, I'll allow the readers to compare it to the first battle. 
 

Austrian Formations

Losses %

Prussian Formations

Losses%

Infantry

Cavalry

Artillery

Infantry

Cavalry

Artillery

BROWNE


FREDERICK III


Lucchese


Gessler


Lobkowitz

-

15

-

Katzler

-

15


Hedwiger

-

39

-

Kyau

-

17


Schwerin

-

51


Kollowrat


Katte

-

14


Macquire

13

-

-


Krottendorf

14

-

-

Keith


Wollfersdorf

10

-

-

Bevern

14

-


Perony

16

-

-

Kleist

25

-


Braunschweig

11

-


Radicati


Hirschfeldt

0

-


O’Donnell

-

42

-


Lowenstein

-

18

-

Independent troops


Grenadiers

9

-


Lacy


Guards

6

-


Hadik

0

26

-

Hussars

-

14


Wied

13

-

-


Artillery


Independent troops


Moller

-

-

16

Grenzers

12

-

-


Grenadiers

31

-

-


Artillery


Fuerstein

-

-

46


The next battle sees us back to Napoleonics. I've kept it as a surprise and it is a new game. Until then.